Two miles from the end of a 72 mile ride, I briefly stalled the 850T at a light and could not get it restarted. The battery appeared flat as the starter just clicked and would not turn over. Quickly assessing traffic and noting a very slight downhill, I snicked it into second gear and duck-walked just enough to bump start it to life. Very relieved, those last two miles had me giving thanks that I had not stalled it earlier in the ride, and/or somewhere on a flat grade.
A check of the battery at home proved that there was a fault in the charging system; it was only 10.5V, having left before the ride with at least 12.5V. It had been charging properly at last check about 6 months earlier. Consulting several troubleshooting guides, I got to work to trace the usual suspects and identify the problem. The charging system is essentially made up of four parts. The rotor and stator take rotational energy from the crankshaft and turn it into AC power, upwards of 100V per phase depending on the type. The regulator and rectifier (r/r) cut off the AC peaks and restrict the DC output to a range that the battery can handle (roughly 12.5V to 14.5V).
First check, what's coming out of the r/r? At first I got a few erratic swings, one of which was up to 18V*. Later trying again the expected voltage of 14.5V was not reaching the battery when the engine was revved up to 4000 rpm (staying somewhat flat at 12.5V). But the solid state r/r was then ruled out when resistance and diode measurements using a multimeter figures checked out as expected. Then, resistance of the rotor windings measured between the copper slip rings also checked out, as did grounding of the rotor. And then, resistance between the phases and grounding of the stator was measured. This too checked out. A final test involved running the bike again and revving from idle while measuring AC voltage output from each of the yellow phase wires. Something was clearly up when only 3V was registering in each of the phases. These should be showing at least 50V AC each at higher rpm.
So this pointed to a bad rotor or a bad stator; stators are not known for breaking, but rotors are (averaging around 40K miles or so). But, both of these independently produced normal readings in testing.
This puzzled me for some time, prompting follow up with Gregory Bender who provided the wiring harness. His prime suspect was the rotor, but also ensured that I check r/r grounding. While re-doing several of the charging system diagnostic checks, I realized that one thing was overlooked. The rotor resistance had been taken directly via the copper slip rings, but the leads to the brushes which contact these rings were not routine items on the checklist(s). Sure enough, one was measuring contact and the other nothing. As these are hard to inspect while mounted, I pulled the alternator off the rotor. The second photo below shows the significance of the contact problem. The forward brush was worn to a nub; there was no more pressure that the spring could provide to push it down (inside the white plastic housing) enough to contact the rotor. As the charging system had worked many rides earlier, this slowly got to a point where contact was lost. Again, thankfully it came to light in a place and circumstance where I could resolve it without being stranded.
So new brushes arrived, and once installed the output of the stator is back to ~50V per phase. However, the r/r is putting out over 18V at 4000 rpm, so back to diagnostics again (has to be a dodgy r/r**)!
Pretty routine stuff on any bike, modern or classic, actually, but another example of the many potential issues and problems that are commonly associated with riding and maintaining a motorcycle.....
*(failing brush connection discovered later helps explain both erratic readings and eventual flat voltage)
**(r/r returned to manufacturer; testing revealed it was faulty, and they replaced it under warranty)
 |
| exposed stator/alternator on front of 850T; three yellow wires for three phases |
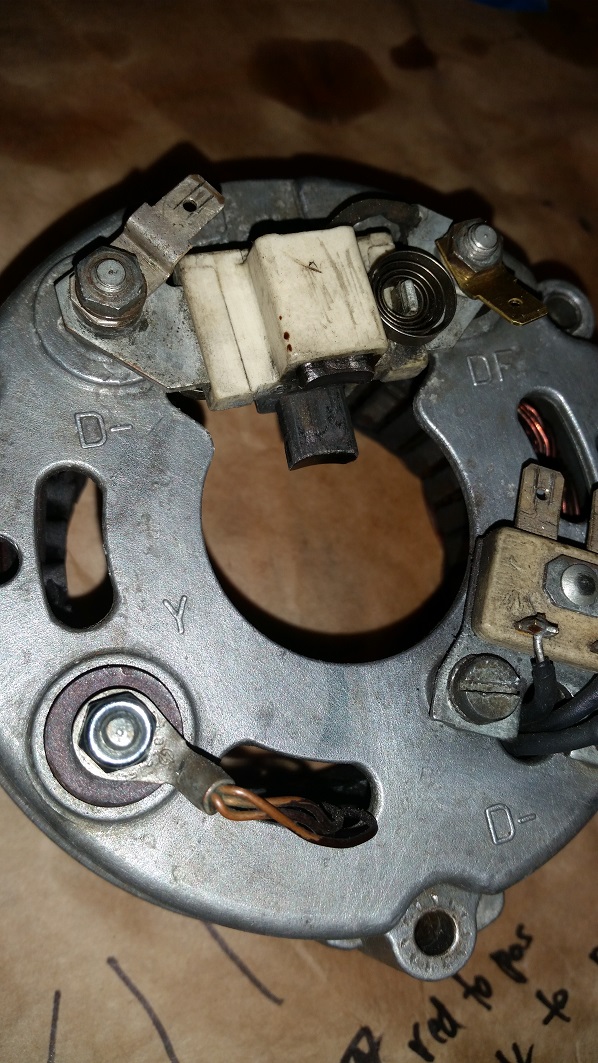 |
| a 'spring loaded' brush for each copper slip ring on the rotor; note forward brush worn to a nub |

